This column originally appeared in Photographer’s I magazine
Photography seems like a nice clean, simple hobby or profession. Yet, as any photographer can tell you, we deal with crud all the time, and in many forms. I’ll save you the stories of crawling through mud, wading through swamps, slogging through sand, or fighting off the toxic fumes spewing from volcanoes. Those “external” encounters with crud usually only mean that we’re cleaning or discarding our attire most of the time. No one wants to know what detergent I use in the washing machine or see me naked.
So today we’ll satisfy ourselves by just looking at the internal encounters with crud: the stuff or cameras collects that we don’t want.
Crud has been with us forever. In the film days, most crud fit into one of three categories. First, we had dust and dirt itself. Film had a soft texture to its coated side, and very small particles would get mired in the emulsion without any forces needed other than gravity and surface tension. If the air was dusty—and especially if you changed lenses—some of that crud in the air became crud in your emulsion. If left there through the processing and printing steps, that created dark (slide) or bright (negative) spots in your output that had to be touched up. Heaven help you if the particle that got into the emulsion had a chemical interaction with anything.
But embedded dust, dirt, or grime also caused the second potential crud impact: scratches. Some cameras were notorious for tight bends of the film prior to or just after the film gate, and a big particle getting wedged into that (usually metal) pivot point was bound to scratch your film. That wasn’t the only way we could scratch film, though. Plenty of handling problems could produce scratches, including poorly maintained processing equipment.
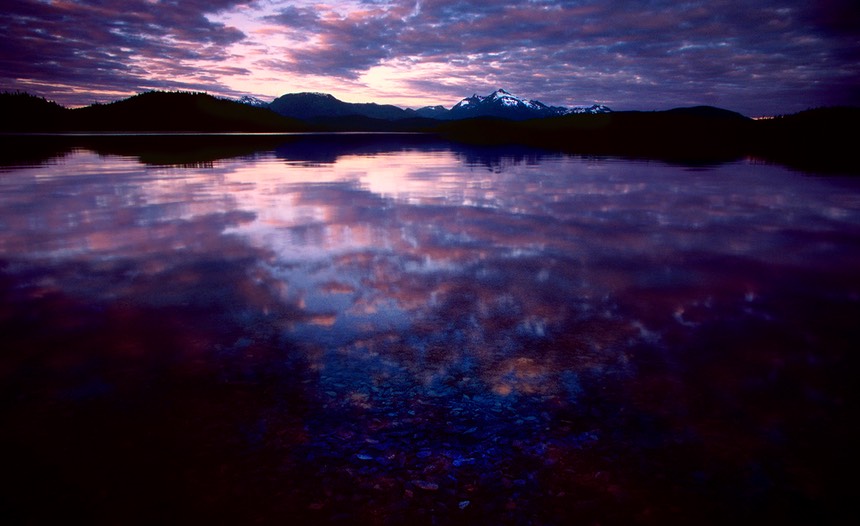
The third form of crud we encountered in film was contamination. This had a wide range of possibilities, starting with those volcanic fumes and ending with someone just not washing the final negative or print well enough. In between we had someone mixing up the chemicals in the wrong percentages, using the wrong chemicals, and even something as simple as not using distilled (clean or filtered) water. This following old photo of Hasselberg Lake in Alaska, for example, had a large area of processing contamination that I had to fix. Given that the grain is visible, that meant that I had to go back and add grain (another form of crud) into the area that I reworked. Yuck.

As you might notice, all the worst forms of crud with film were physical. Thus, the way we dealt with them was simple: we reduced exposure to those that were externally contributed (dust, dirt, unfiltered water, etc.) and we increased attention to getting formulas and processes right in the processing and printing steps. Basically, we were clean freaks who followed instructions carefully. Needless to say, a little bit of OCD helped. Okay, a lot of OCD.
Digital presented us a different world. A lot of the crud we encounter in digital isn’t physical, but virtual. Sure, we still have dust/dirt issues. Get either stuck to the filter over the imaging sensor and you’ll be de-crudifying your images with the Photoshop clone tool or something similar. That’s not a lot different than the spotting brushes we used to use on prints in traditional film.
That virtual crud is another story, though. Just being a clean freak who follows instructions no longer is enough. Now you have to be a geek with strong technical cred, too.

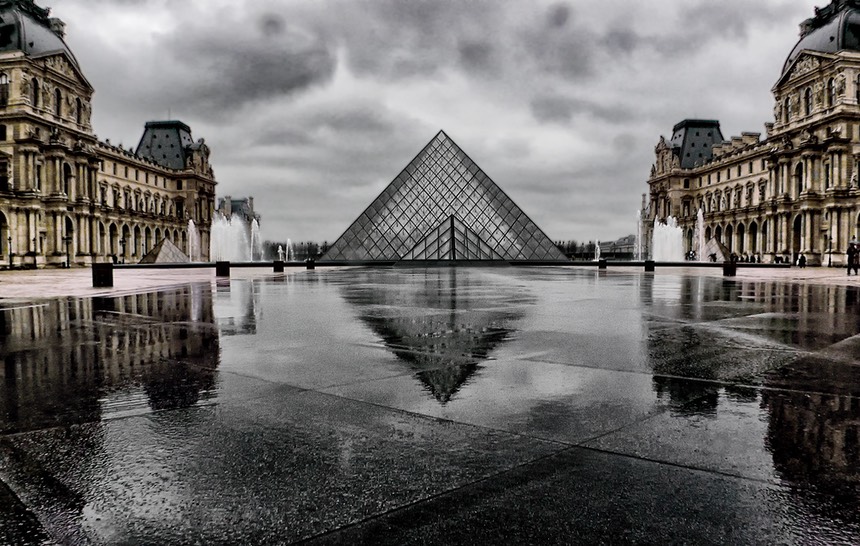
This image is another very old one I’ve pulled from my files. It was taken with the 2.9mp Nikon Coolpix S900 for a magazine over a decade ago. I’ve processed this image to within a hair’s width of its life. This is as much as I can get out of it. Why? Because there’s a ton of crud in it.
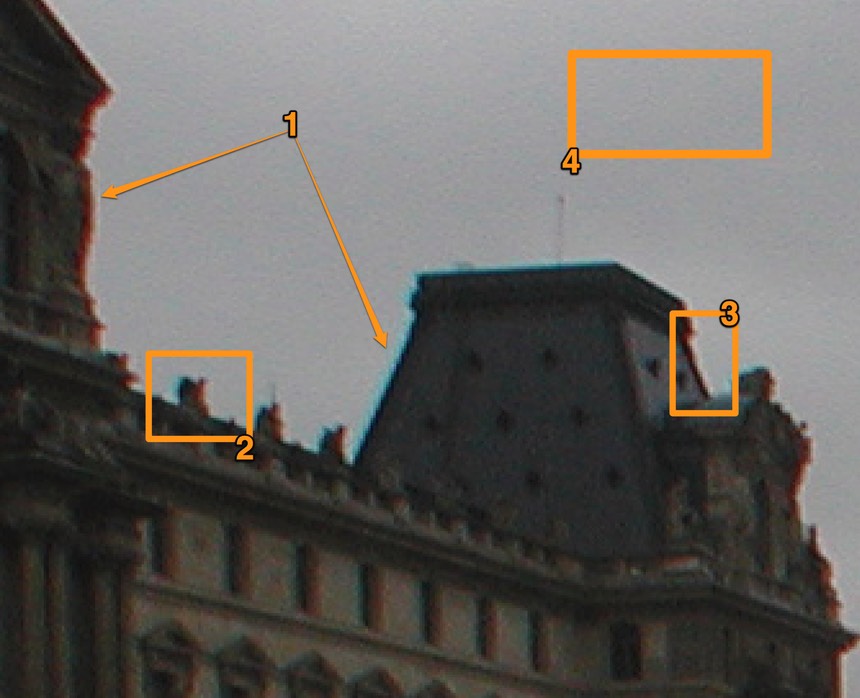
Let’s look at some of that crud. In fact, let’s delve right into just one part of the image in its original form, because we’ve got a smorgasbord of nasty things to deal with.

First up (#1) is something that we had in film, too: chromatic aberration. The red and cyan edges on the building verticals are crud caused by the lens not focusing colors at the same point. Most of the time these days we can take this out of an image’s pixels in post processing (and even in some cameras while creating JPEGs). This particular example I’ve pulled up is interesting, though: it exceeds the amount of correction I can make in Photoshop. I can reduce most of it, but I still get a faint color residual at the edge itself.
While chromatic aberration was present in film, the fact it recorded in different layers and light often hit those layers at an angle, it tended to get masked. But with this Coolpix, the edge colors are wide and well recorded. Enough so that not only did I have to do chromatic aberration correction in Photoshop, but I had to figure out a way to even more color out of the edges (hint: use Replace Colors, select with a very narrow sample, and desaturate).
As it turns out, digital is very faithful in recording crud that comes to it from the lens (vignetting, chromatic aberration, linear distortion, coma, and a host of other lens defects). These days, lens designers are working with the JPEG rendering designers for cameras to design a complementary pairing so that software can take out these lens defects. Obviously, the Coolpix S900 engineers hadn’t gotten that far. But starting around the time of the Nikon D90, Nikon got very good at this. Today, all camera companies do a wide range of lens crud removal.
Let’s skip ahead to crud #3, because it’s related to the first: see the “white” along this building/sky edge? It’s touched with a bit of chromatic aberration, too, but the white is from in-camera sharpening artifacts. You can see them all along the roof. Most sharpening methods tend to produce similar artifacts, as they use a traditional darken-one-side-of-the-edge-and-brighten-the-other-side type of contrast change. Contrast changes hidden at edges, such as the building/sky junction here, give the appearance of adding sharpness, but the key word is “appearance.” We don’t actually correct an imperfection caused by the lens (focus point not right, lens doesn’t resolve well, etc.) as we did with chromatic aberration correction, but we instead we use trick that plays off how our brains interpret edges: more contrast = more edge.
The only problem here is that the white pixels are a dead giveaway, because they’re artificial crud. The sky should be gray, not white. So when we look closely as we do here, we actually see that white pretty easily. Indeed, our eye/brain is highly sensitive to bright areas, so we have a hard time not seeing this little splash of white that shouldn’t be there.
Here, too, the camera makers have gotten good at masking the crud level. That’s why I dug way back into my files to find this image: each progressive generation of newer camera tends to get better at masking the crud that comes from applying sharpening. Some have gotten so subtle that when you look really close the “sharpening” looks a bit like anti-aliasing (or blurring).
And yes, that’s yet another form of crud in our digital images, at least for the cameras that use anti-aliasing filters. Unfortunately, the digital cameras that don’t use anti-aliasing filters give us yet another kind of crud: aliasing. And potentially color moire. How do you mask those things? Sample at a higher frequency (e.g. use more megapixels).
One big contributor to our image’s crud is JPEG itself. JPEG is a special form of compression. It works by chopping the pixels up into 8x8 blocks (64 adjacent pixels), analyzing them, and then writing the information as a formula (Fourier transform) rather than a set of red, green, and blue values for each pixel. Because of the way JPEG does its work, it tends to throw off two forms of crud, and we’ve got some of both in this image.
In area #2 you might notice that the little turret detail sticking up off the roof has all forms of trouble. We’ve got some chromatic aberration on both sides and a hint of sharpening white, but why does it look like the upper right corner has a little “spray” of detail trailing off to the right? Better still, go two turrets over and look between it and the large cut-off pyramid portion of the roof: there’s a spray of dark pixels that seem to not belong. That’s because they don’t belong, they were put there as a result of the JPEG rendering.
A loose definition of how JPEG came about is this: how much information can we change or throw away to reduce the size of the data storage needed while keeping the visual results in a realm where most people don’t notice a difference? Even today with all our terabyte storage devices and huge portions of computer memory, storage size is important. Anyone with a cell phone data plan knows just how fast digital bits can add up into dollars out your pocket, but some of us have time issues with data, too. For example, when you shoot a sporting event for a national publication here in the US, the photo editor wants your images Now! Not in an hour, not by tomorrow, not later, but Now! The more bits you have to send them—and I’ve been known to fill a 64GB card or more at some events—the longer it will take.
So we want JPEG for its ability to make smaller sized files, but in return we have to put up with JPEG artifacts. There’s another type of those JPEG artifacts in this image, by the way: blocks. Area #4 has them if you look closely enough. Because JPEG is collapsing data from an 8x8 pixel block, bad things can happen at the boundaries of these blocks. More often than not, those bad things happen in tonal ramps that change subtlety, like skies.
Take another good look at the final version of the Louve picture. Do the dark features in the sky look just a teeny bit “blocky”? Yes, they do, because in working with the sky tones I pulled out some of the JPEG artifacts that were lurking just beneath the threshold of visibility. I could have, perhaps, done a selection on the sky and done some form of Gaussian blur to try to mask those blocks, but I’ve deliberately processed both images I present in this month’s column to leave some visibility of the problems I was dealing with present.
If I were going to either place today with the latest equipment, I’d be far less worried about these obvious crud problems than I would be about much more subtle things. Still, I’m pointing them out because they’re still present. You can still get physical crud somewhere where it doesn’t below (e.g. on the filter over the sensor), your lens may still have defects that will show up, and if you use JPEG the camera’s rendering engine can produce artifacts, too.
One of the things that we have to do to collect Optimal Data (remember, that’s the column’s name), is to eradicate crud anywhere we encounter it. Now that I’ve set the foundation for just a few of the things we need to be aware of, I think we’re ready next time to head out into the real world and start our Optimal Data capture. As it turns out, the kinds of crud I’ve written about here is just the visible butt of the tick. We’ve got a lot, lot more to deal with, and some of it’s buried deep in our data.
So step out of this month’s Wayback Machine and contemplate what you’ve learned in anticipation of next time. Ask yourself one thing: am I controlling everything that gets into my data? I once thought I was. Then I started digging. Under the surface crud is other crud. As it turns out, we have quite a few things that we need to pay attention to if we want to capture the best possible data while we’re out photographing.
There used to be an old saying in the computer data processing business: garbage in, garbage out. That’s not entirely true of photography: garbage in, lots of Photoshop time before you get anything out.
