Aug 24—Those of you who've been on one of my workshops before or have read about them probably wouldn't recognize today. While we had a fairly long drive to get out of Cape Town and up the Eastern coast, I had a few surprising things up my sleeve photographically.
Would you believe we spent the morning in the cellar of a winery? That's so unThom-like that it might even shock a few people. After all, I don't drink, so a winery isn't exactly a place I typically visit. But I'm also not known as an indoor photographer, either, so down in a wine cellar is a rare place to find me, let alone one of my workshops.

But there's method to my madness: what better place to try teaching multi-flash lighting than someplace that isn't lit? And so I went into my best McNally imitation, though without the frenetic chatter, the jokes, or the blur of activity. (Sorry Joe, but you have to admit that you sometimes look like a speeded up movie when you're talking up a lighting situation. If Joe's movie is running at 12 fps, then I must be at 36 fps ;~).
Let me step you through the multi flash lighting process, Thom-style.
One of the great conceits (of both Nikon and Nikon pros) is that "you just turn on TTL and fire away." One of the things I always teach is to take control of everything. You make hundreds of decisions when you photograph. Hundreds. Or you can let the camera make them for you and get some, perhaps many, of them wrong. Or you can take control and get them all right.
Light is the life of our photographs. Without it, we don't have a photograph. With the right light we have a remarkable photograph. Running light from the pop-up flash or hot shoe flash controlled by the camera is highly likely to be the wrong light, in the wrong place, with the wrong intensity.
To demonstrate this, I arranged with the Vrede en Lust winery to have access to their cellar. Yes, it has some overheads so the workers can see, but with them turned off, the place is nearly lightless. I had brought my "small" location lighting kit, which consists of two flashes and all the accessories to shape and modify the light, plus a few other goodies that are helpful. Here's the short version of what we did:
- Establish the ambient. If you do have ambient light--and we had a small amount--you first figure out where you're going to use that and set your exposure for it. Often times I'll set a slight underexposure for the ambient and run my flash to create pockets of light where I want something above the underexposure (typically the subject and perhaps a few supplemental details in the background). We had almost no ambient in the cellar, so there wasn't much to do here.
- Light the subject. The first flash went off camera at a pleasing angle on the nearest wine barrel and was set as the Master. It's off the camera axis both to establish mood and to allow us to hide shadows out of frame. Our first test shots established the value on this master light (everything else was going to be triggered off it, though I did bring Pocket Wizards so that we could go to the radio if we couldn't get the line of sight the Nikon i-TTL system needs).
- Light the next layer behind the subject. The second layer of barrels needed just a little less light than the front barrel, so obviously we dialed this flash down some from the main flash (This flash is Slave: Group A). We positioned it with a NastyClamp I had brought, which we clamped to a handy nearby rack.
- Light the third layer behind the subject. In this case, it was a wall that had been painted yellow. But we didn't want it yellow, as we didn't think the Canary yellow of the wall gave much contrast or support to the warm colors of the casks. That's the fun thing about doing flash manually: you control everything. So out came my Strobist filter kit and we put red filters over the third flash head (Slave: Group B). Voila, the wall was a reddish color that was more pleasing than the yellow paint. We could have made it blue, green, a different yellow, just about anything we wanted. It's just a matter of finding the right filter. (Remember, if you're putting colored light on a colored wall, you may have some additive color issues to deal with, so the color of the filter you use may not be the final color you seek.)
- Light the background, if necessary. Usually the ambient lights up the background, but we had almost no ambient, so we decided to add another light to the far background at this point (Slave: Group C).
Put another way: we built the light bit by bit, controlling the intensity, direction, and color for everything. I'm sure McNally would have nailed it in 20 minutes, but it took us an hour, partly because I don't talk as fast as McNally and partly because we got to the second light setup and discovered my batteries were fast running down. Of course extra batteries were the one thing I hadn't carried down into the cellar with us, so we had a small delay as someone went back up to the vehicle and retrieved batteries. Note to self: extra batteries should go in the case labeled Flash Accessories. Oh wait, they were. Doh! Darn it if I hadn't thought of that when I built my cases, but somehow I didn't remember that I was anal enough to think of everything, so I didn't actually look for batteries in my lighting case. Too bad we couldn't tap the casks while we were waiting for replacement batteries that I actually had but didn't notice.
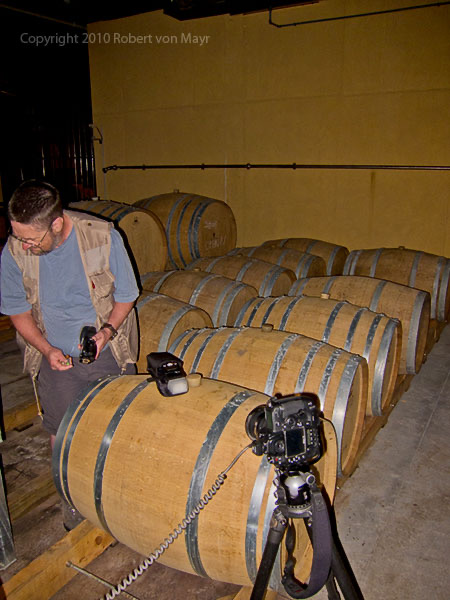
Here's me working at setting up the first light:

And here's the shot we were working on (note that the plan was to stick a model behind the first row of barrels, but because of my slowness in getting everything set up, we never quite got to that step):

The wall is a little too red and hot. Next step would be to dial that back a bit. But note the change in the color of the barrels: we've lit them warmer than they are, and intentionally so. Once the wall was dialed down, my next step was to bring in the model and light her, but as I noted, we were running out of time (we still had a scheduled wine tasting and lunch to get to).
Okay, so I didn't think everything out quite as well as I thought I had before heading into the cellar. Still, it was a nice teaching hour, and everyone got a taste of exactly why pros have assistants and spend a lot of time setting up lighting before the models show up.
And yes, we stayed and tasted wine. Well, at least the others did, I just watched and sniffed, as I don't drink. And we had a fabulous lunch. All of which lasted far too long for a photographic workshop, but not long enough to keep us from another unThom-like destination.
Our final destination of the day (our third--I've skipped over one in this blog, otherwise I'd be writing deep into the night) was the monument in downtown Franschhoek. Yep, Thom is photographing human-carved stone for a change. Oh, and flowers again (we had a few hours in a garden late yesterday that I didn't write about). Go figure. Nobody said this workshop was going to be just about animals (that would be the Botswana workshop that follows this one). Indeed I'd long planned this workshop and tour as a real smorgasbord of photographic opportunities. So here we were photographing a local monument. It took a bit for people to warm to the challenge, but eventually I found that everyone deep ended into working a shot that they liked.
One of the interesting things about so many photographers in a constrained space with a constrained subject is that they all still manage to find different shots. The "reference shots" are easy: just stand in front of the thing, frame it all, and fire. But shots that capture the character of the place, the lighting, the accouterments, the environment, or the location take a little thinking and result in seven photographers going different directions. Eric spent a lot of time down low and close to the water to get his shot (above). I ended up behind the monument, because I became more fascinated by the shadows it threw:
So a very unThom-like day, but don't worry, there will be some Thom-like ones showing up soon...
